

Hand a coat to a tailor and say “make it brown,” and you’ll get a brown coat. Just maybe not the one you pictured. Suede or wool? Shearling collar or plain? Same length? Keep the lining?
AI photo editors work the same way. Vague instructions get guesses, and guesses are where changed faces and redrawn backgrounds come from.
An editing prompt is how you brief the editor: what to change, described in detail, and what to leave alone. Below are 12 you can copy, grouped by six types of edit, plus a quick fix list for when an edit goes sideways.
What Is an Editing Prompt
An editing prompt is a text instruction that tells an AI image tool how to change an existing photo, rather than create a new one from scratch. A strong editing prompt names what to change in detail, what to keep untouched, and the style or lighting the change should match, so the edit stays local and the rest of the image stays intact.
The Editing Prompt Formula
Most failed edits have the same cause: the prompt says what to change but never says what to protect. Every prompt in this guide follows four parts:
| Part | What it does | Example |
| Edit | Describes the exact change in detail | Change only the coat to chocolate-brown suede with a faux-shearling collar |
| Keep | Locks what must not move | Keep face, pose and background identical |
| Style | Matches light, mood or texture | Match the existing soft window light |
| Constraint | Rules out unwanted extras | Do not add new elements |
4 Types of Editing Prompts
Almost every edit falls into one of four types: Replace, Remove, Add, Restyle. Learn the pattern for each, then adapt the prompts below to your own photos. Each prompt lists what it locks and one tip to make it more reliable.
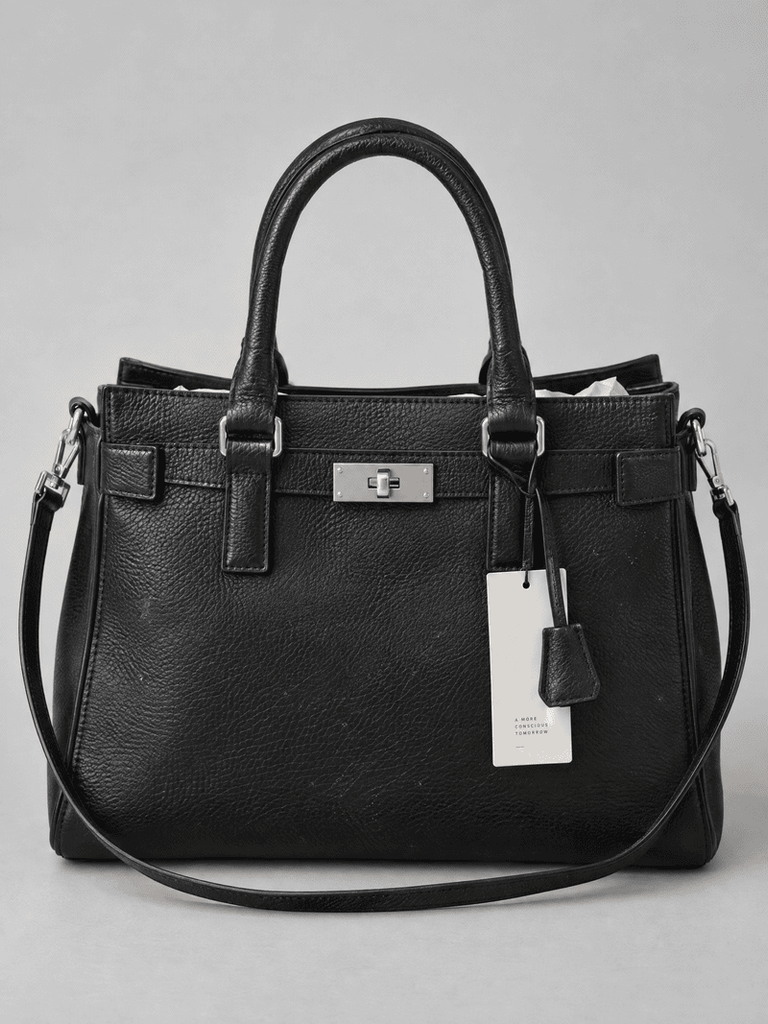
To show how the same prompt logic works on different kinds of images, every example below edits one of two photos:
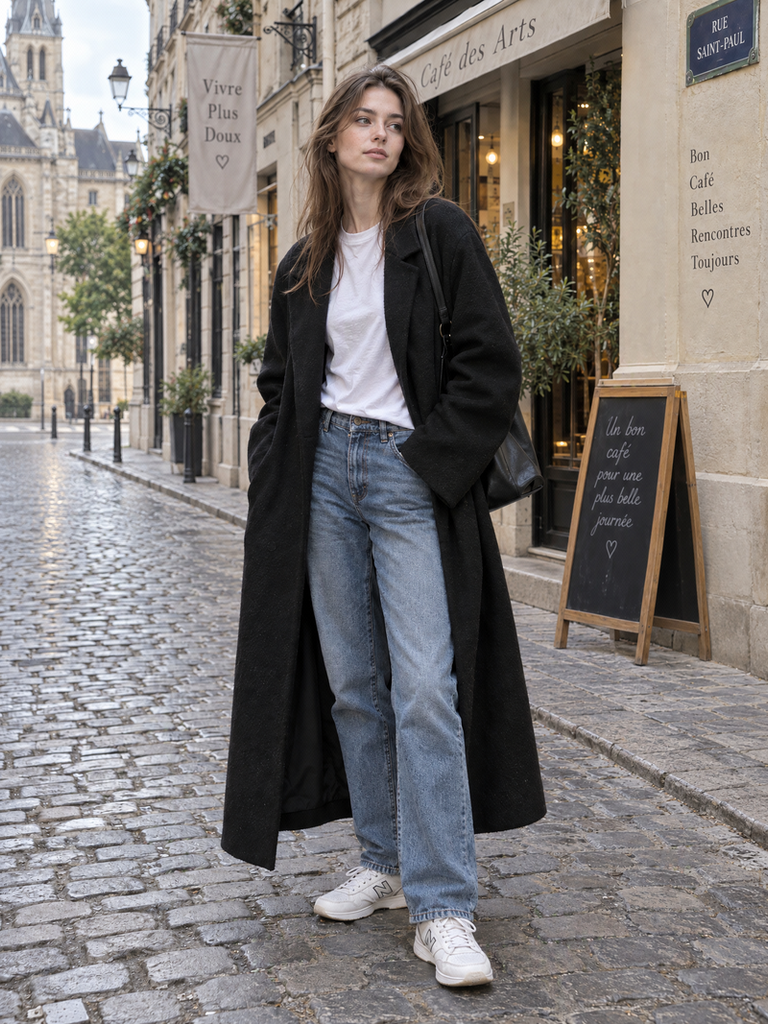
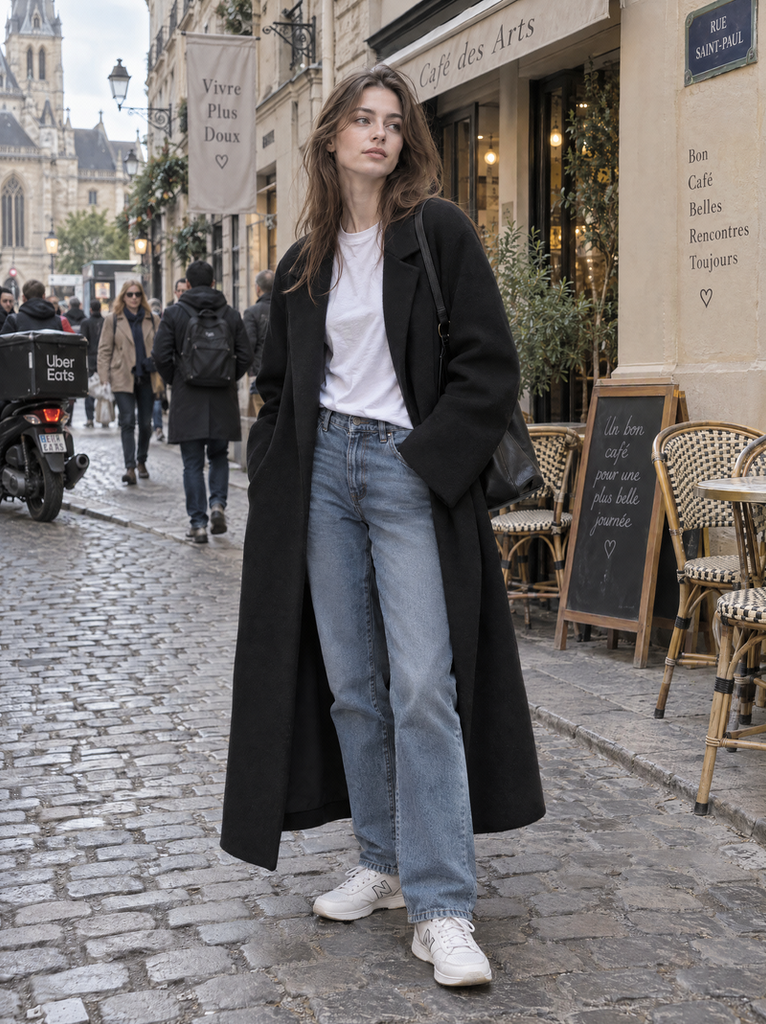
Photo A (outfit): a full-body shot of a model in a plain black wool coat, white tee, straight jeans and white sneakers, standing on a busy cobblestone street.
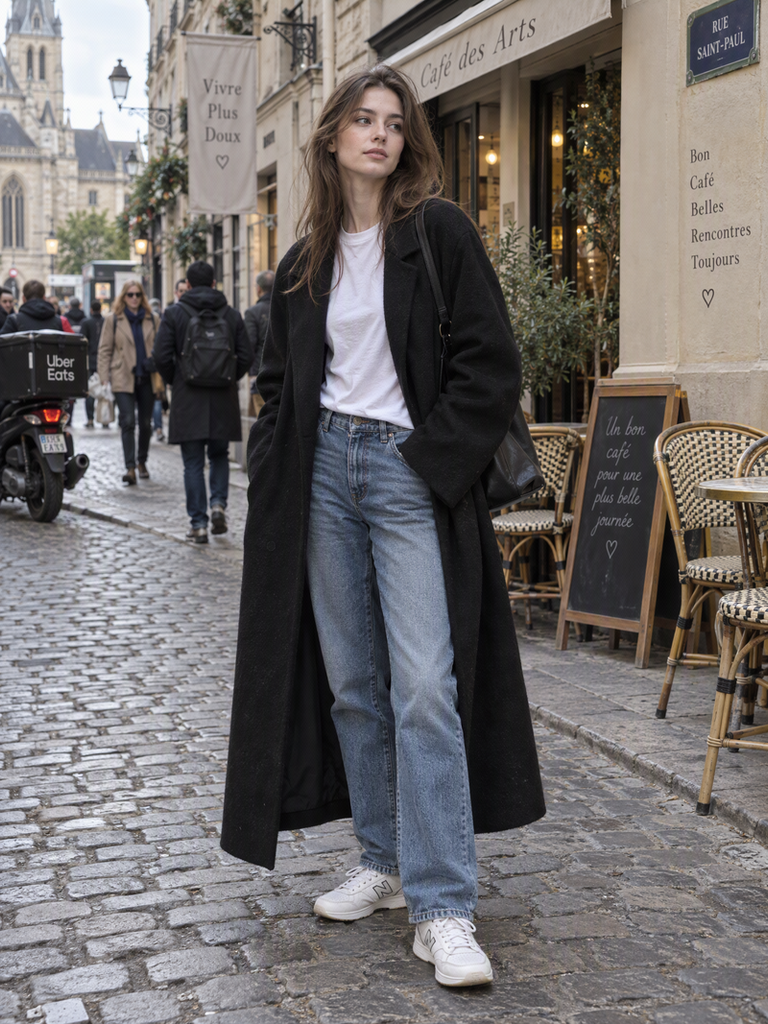
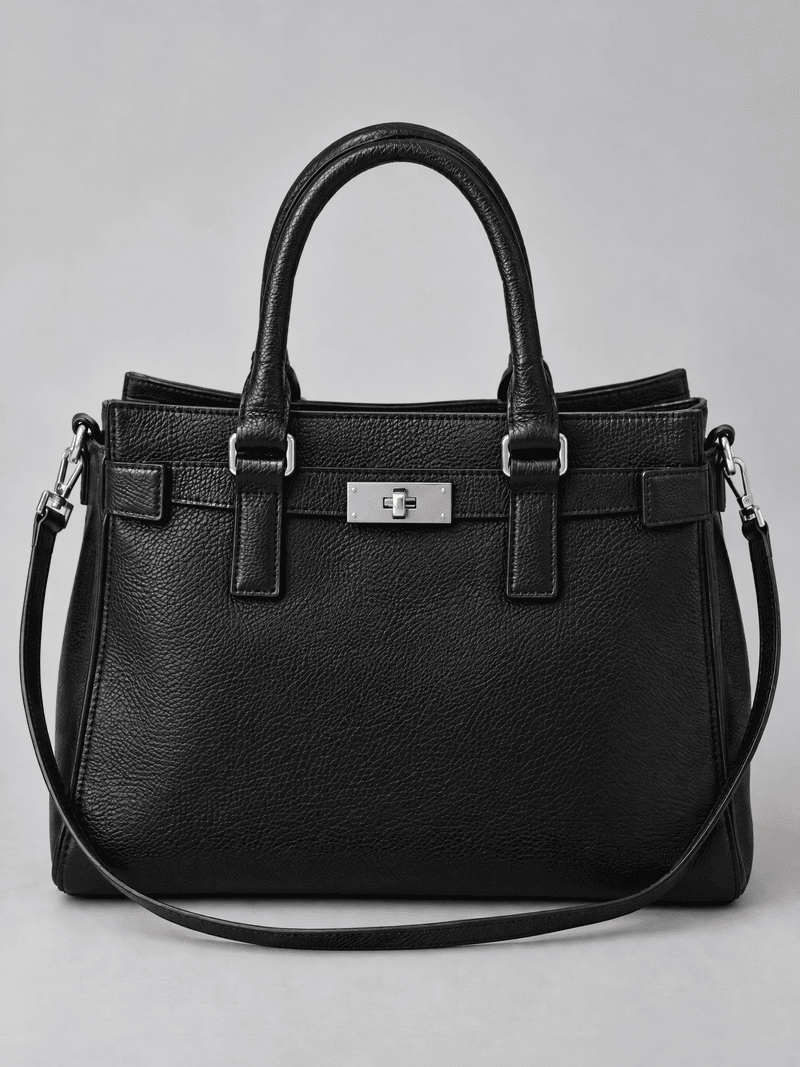
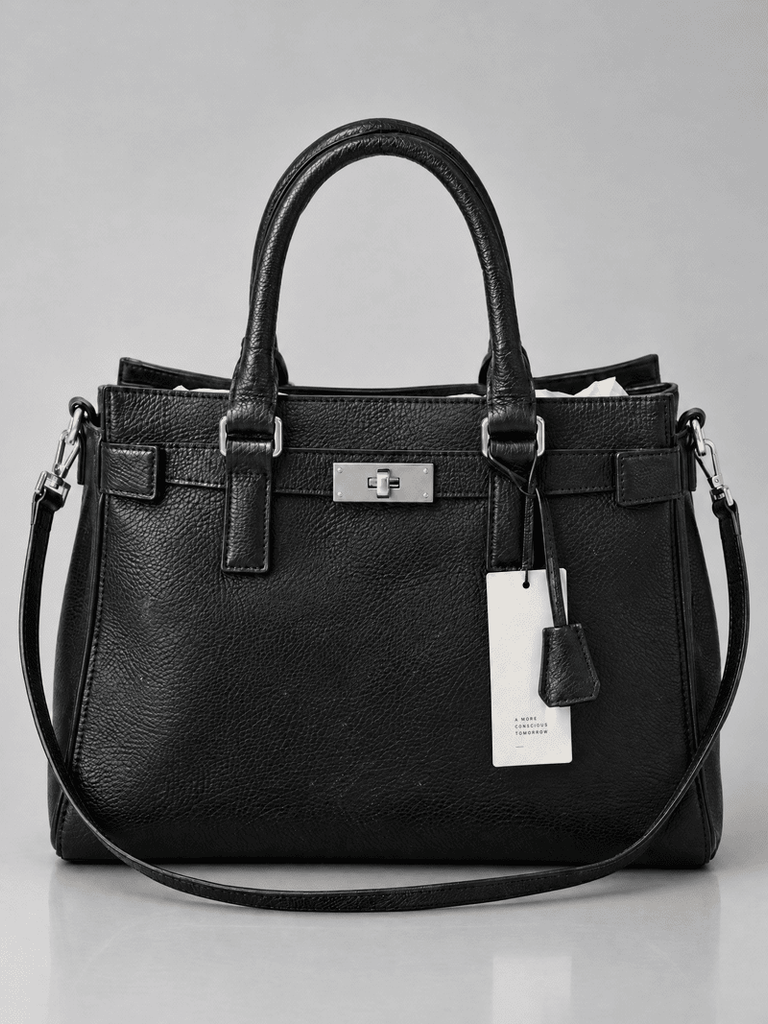
Photo B (product): a structured black leather handbag on a plain light-gray background, with the hang tag and paper stuffing still visible.
Using your own photos? Keep the structure of each prompt and swap in the garments, products and backgrounds you actually have.
Type 1: Replace
Use Replace when you are swapping one element for another, such as a garment, a material or a color. Name the old element specifically, describe the new one in detail, and lock everything else.
Pattern: Replace [A] with [detailed B]. Keep [everything else] unchanged.
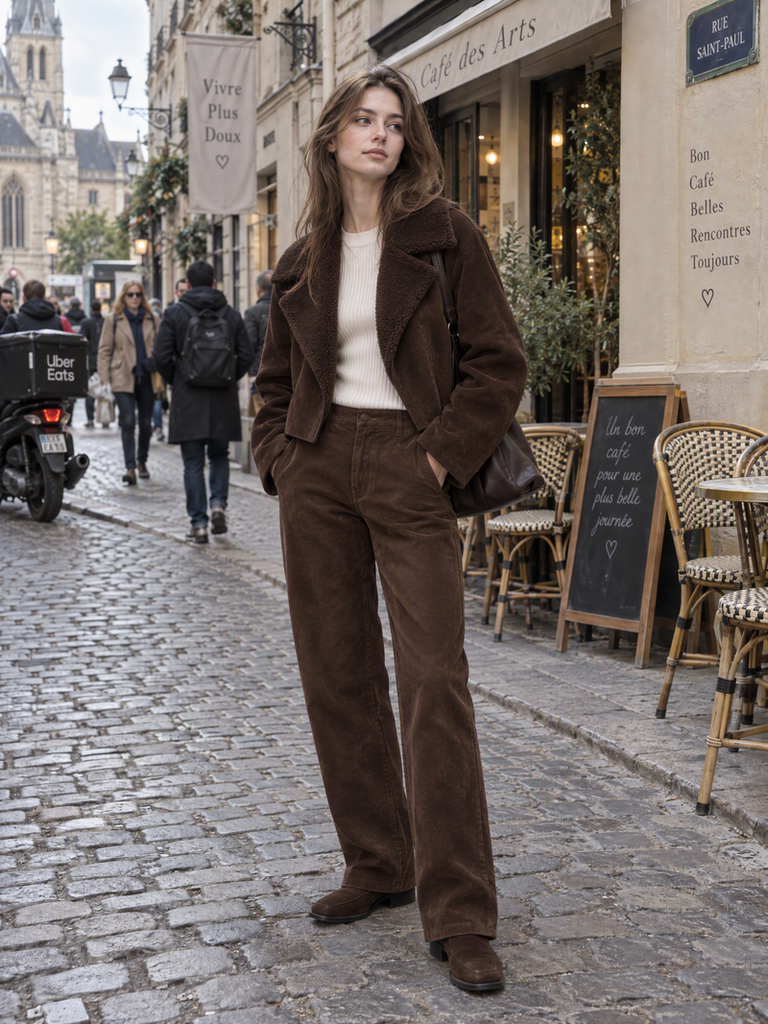
1. Swap the whole outfit for a chocolate-brown suede look (Photo A)
Change only the outfit to a head-to-toe chocolate-brown look: a boxy cropped suede jacket with a faux-shearling collar and wide lapels, worn over a fitted cream ribbed knit top, with matching straight-leg suede trousers. Keep the suede matte with a soft visible nap and natural folds at the elbows. Keep the model’s face, hair, pose, body proportions and background identical.
Locked: face, hair, pose, proportions, background
Tip: Name the finish (“matte suede with a soft nap”). Without it, the fabric can come out shiny like leather.
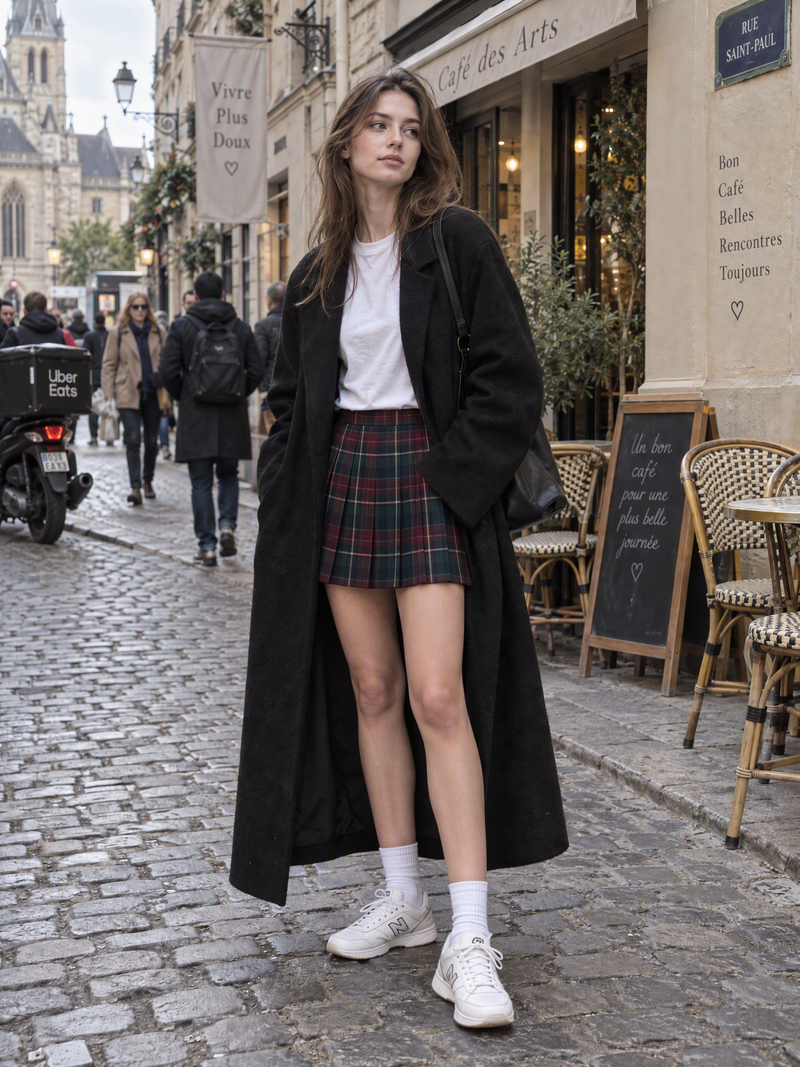
2. Turn the jeans into a tartan mini skirt (Photo A)
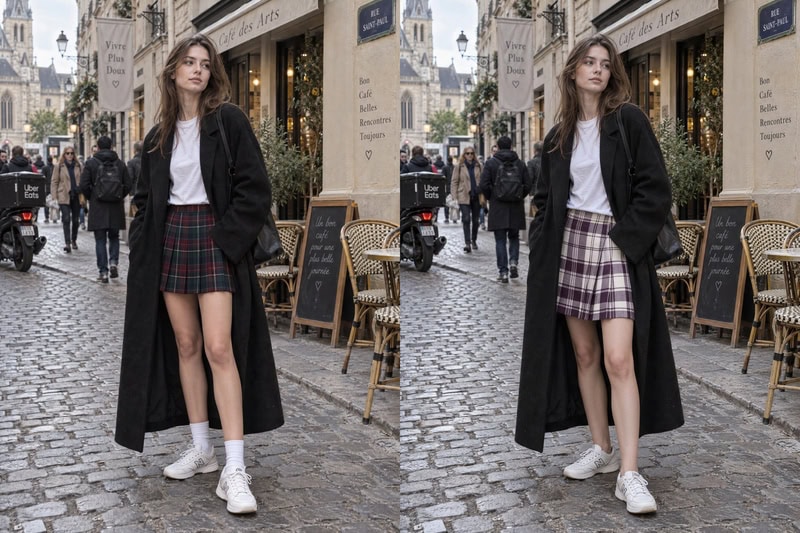
Change only the jeans to a high-waisted pleated tartan wool mini skirt in burgundy, forest green and navy with thin cream pinstripes. Keep the pleats crisp and the pattern lines straight, following the natural folds of the fabric, with a soft wool twill texture. Keep the coat, top, sneakers, face, pose and background exactly the same.
Locked: coat, top, sneakers, face, pose, background
Tip: Say how the pattern should behave (“straight lines, following the folds”). That’s what separates a believable print from a flat sticker.
Want to swap outfits like prompts 1 and 2 on your own photos? Try the AI clothes changer.
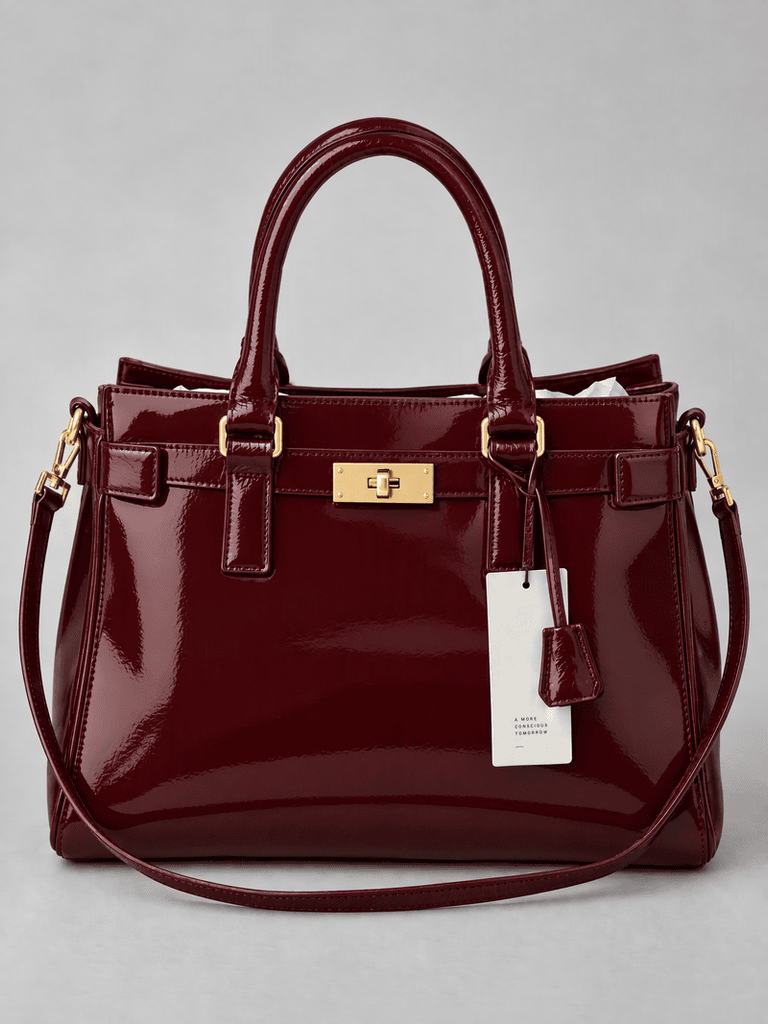
3. Preview the bag in a new colorway (Photo B)
Change only the handbag to deep burgundy patent leather with polished gold hardware. Keep the structured shape, stitching, handles, strap and proportions exactly the same, with crisp soft reflections along the glossy surface. Keep the plain gray background unchanged.
Locked: shape, stitching, handles, proportions, background
Tip: Lock the construction details. Product edits only work if the bag still looks like the same bag. Use this for concept boards or colorway previews, not as a listing photo of a color you don’t sell.
Type 2: Remove
Use Remove to clean up a photo: distracting objects, people in the background, tags or wrinkles. Always tell the AI how to fill the gap, or the result can look smudged.
Pattern: Remove [specific objects]. Rebuild [what should appear instead] to match [surroundings].
4. Clear a busy street (Photo A)
Remove all pedestrians, the delivery scooter and the café chairs from the street behind the model. Rebuild the cobblestone pavement and the storefront facades with consistent shadows and perspective. Keep the model, outfit, pose and lighting unchanged.
Locked: model, outfit, pose, lighting
Tip: Tell the AI what replaces the objects (cobblestones, facades). “Remove and fill” alone often leaves ghost shapes.
5. Clean up a product shot (Photo B)
Remove the hanging price tag, the paper stuffing visible at the bag opening, and the dust specks and fingerprints on the leather. Keep the leather grain, stitching, hardware and the bag’s shape exactly as they are.
Locked: leather grain, stitching, hardware, shape
Tip: Name each item to remove. “Clean up the bag” can end up smoothing the leather texture too.
6. Steam-smooth the coat (Photo A)
Smooth the creases across the front and sleeves of the black wool coat as if it had just been steamed, keeping the natural drape and the wool texture. Do not change the color, length or buttons. Keep face and pose unchanged.
Locked: color, length, buttons, face, pose
Tip: Say “as if steamed.” It’s clearer than “remove wrinkles,” which can flatten the drape.
Type 3: Add
Use Add to place a new element into a photo: an accessory, a shadow, even a product from a second image. The risk is that the new element looks stuck on, so specify the position, the material and the lighting.
Pattern: Add [detailed element] at [position], matching the existing lighting.
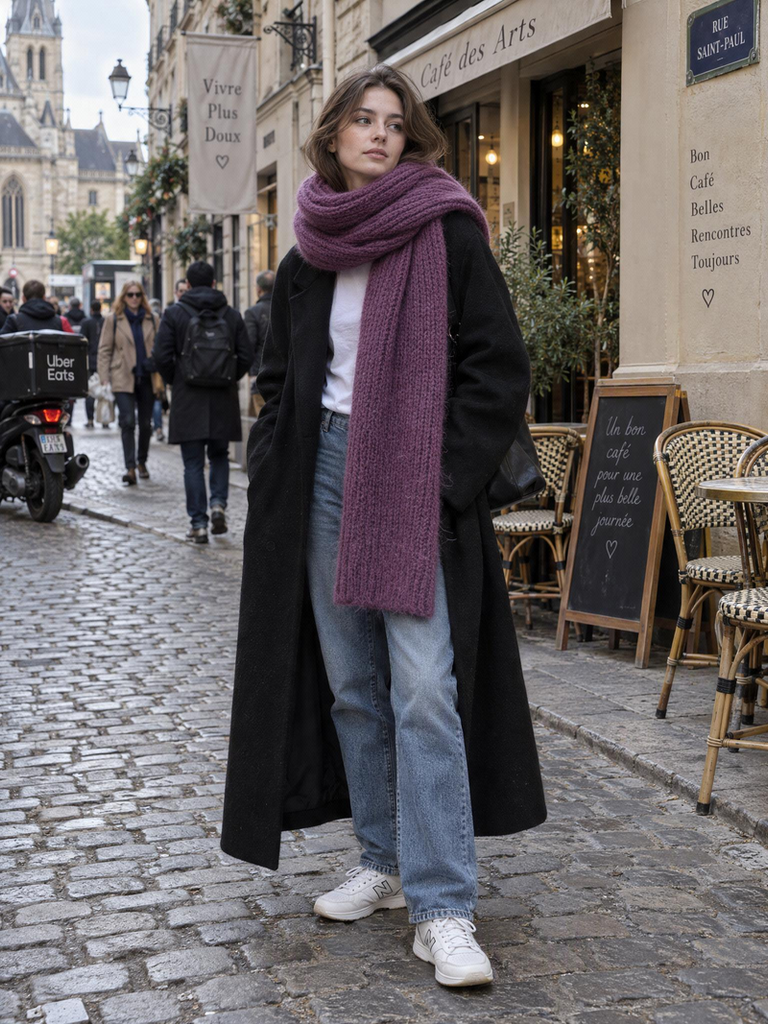
7. Add a chunky scarf (Photo A)
Add an oversized chunky-knit scarf in plum purple, looped once loosely around the neck with one end falling over the front of the coat. Show a visible rib-knit texture and soft wool fuzz. Match the existing light and keep the face, hair and coat unchanged.
Locked: face, hair, coat
Tip: Say how the scarf is worn. “Loosely looped, one end in front” prevents it from reshaping the neckline.
8. Add a natural shadow and surface reflection (Photo B)
Add a soft, natural contact shadow under the handbag and a faint reflection of its base on the surface, lit from the upper left. Keep the bag’s shape, color, hardware and position unchanged, and keep the plain gray background otherwise untouched.
Locked: shape, color, hardware, position, background
Tip: A believable shadow is one of the fastest ways to make a product image look grounded instead of cut out.
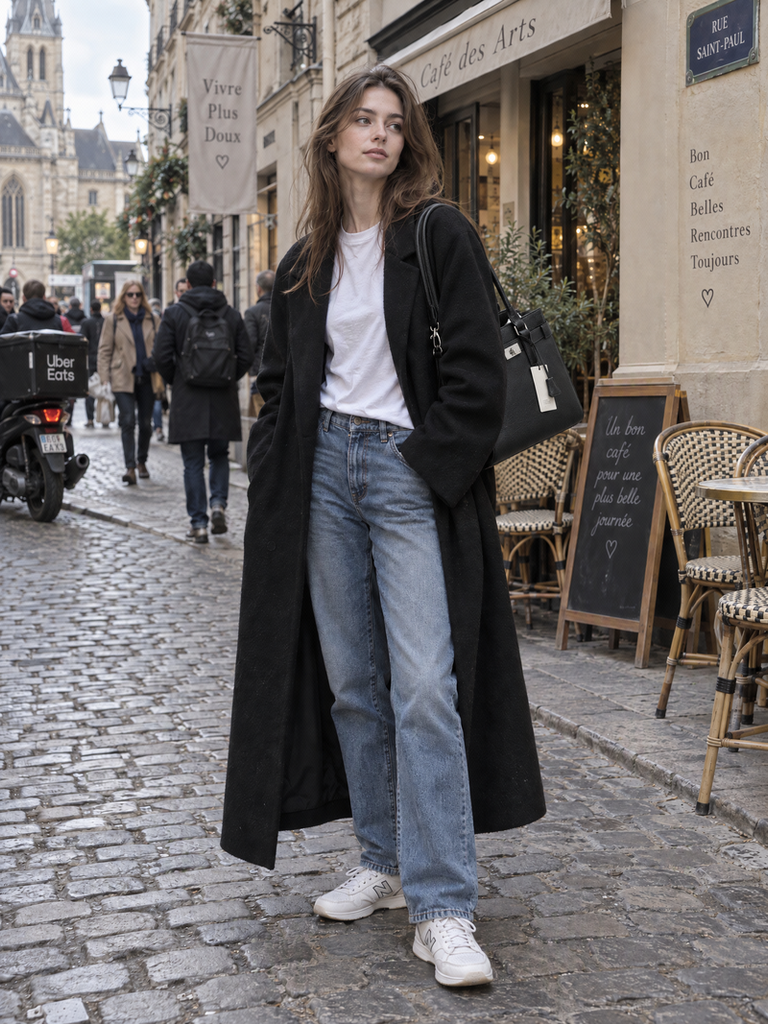
9. Put the bag on the model (Photo A + Photo B)
Use the handbag in image 2 as the reference. Place it on the model’s left shoulder in image 1, keeping its exact shape, color, hardware and stitching. Let it hang naturally and cast a soft shadow on her coat. Keep her face, pose, outfit and the background from image 1 unchanged.
Locked: image 1’s face, pose, outfit and background
Tip: Always label “image 1” (the photo being edited) and “image 2” (the reference). Mixing up the roles is the most common reference-edit mistake.
Want to try putting products on a model in your own photos? Use the mix and match online free tool.
Type 4: Restyle
Use Restyle to change the mood of a photo without changing what’s in it: lighting, setting, color grade. The risk is that style words trigger a full redraw, so be specific about the look and lock the subject.
Pattern: Change the [lighting / setting / mood] to [detailed new state]. Preserve [subject details].
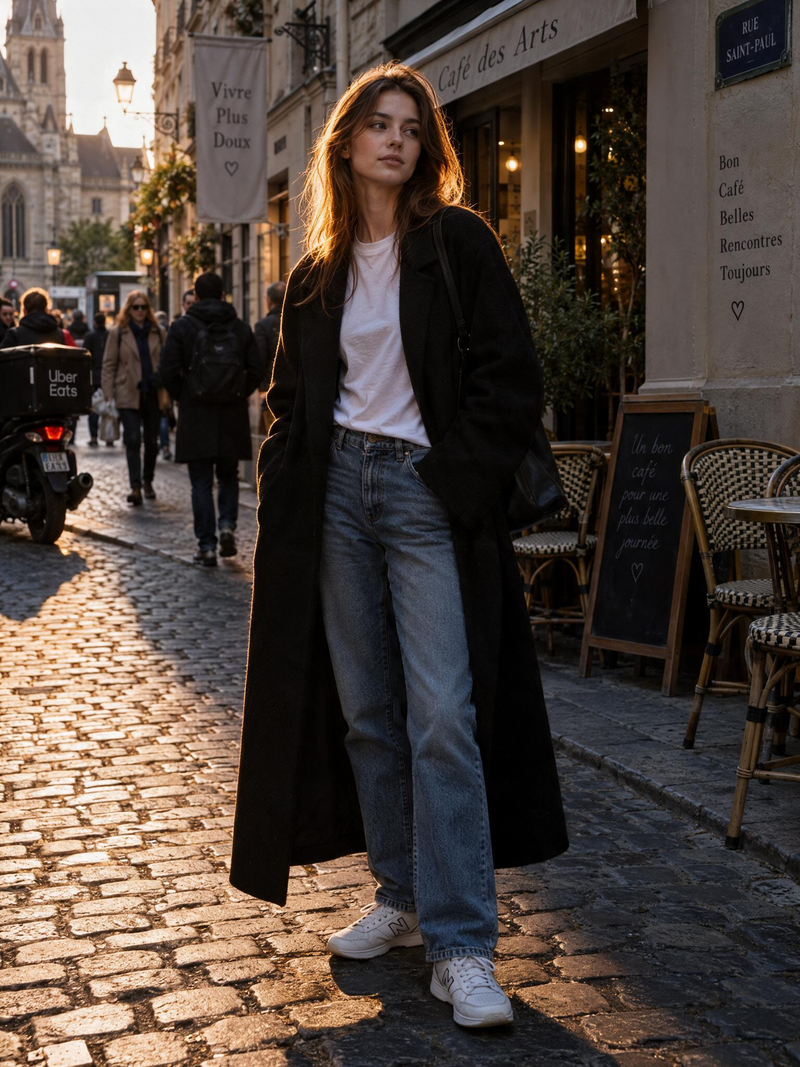
10. Relight with amber evening light (Photo A)
Change the lighting to low, warm amber evening light coming from camera-left, with a soft rim light along the hair and shoulder and gentle falloff into deeper shadow on the right. Keep the face, outfit shape, skin tones and pose identical.
Locked: face, outfit shape, skin tones, pose
Tip: Name the direction and the shadow side. “Warm light” alone doesn’t change where the shadows fall.
11. Style the bag in an autumn still life (Photo B)
Replace the plain gray background with an autumn still-life setting: a rust-colored linen backdrop, a dark walnut tabletop, a few dried ochre leaves and a small brass candleholder at the edge of the frame, lit by soft low window light from the left. Keep the handbag’s shape, color, hardware and position untouched, with a natural contact shadow on the table.
Locked: handbag shape, color, hardware, position
Tip: List three or four specific props and put them at the edges. Props near the product can steal attention or hide its details.
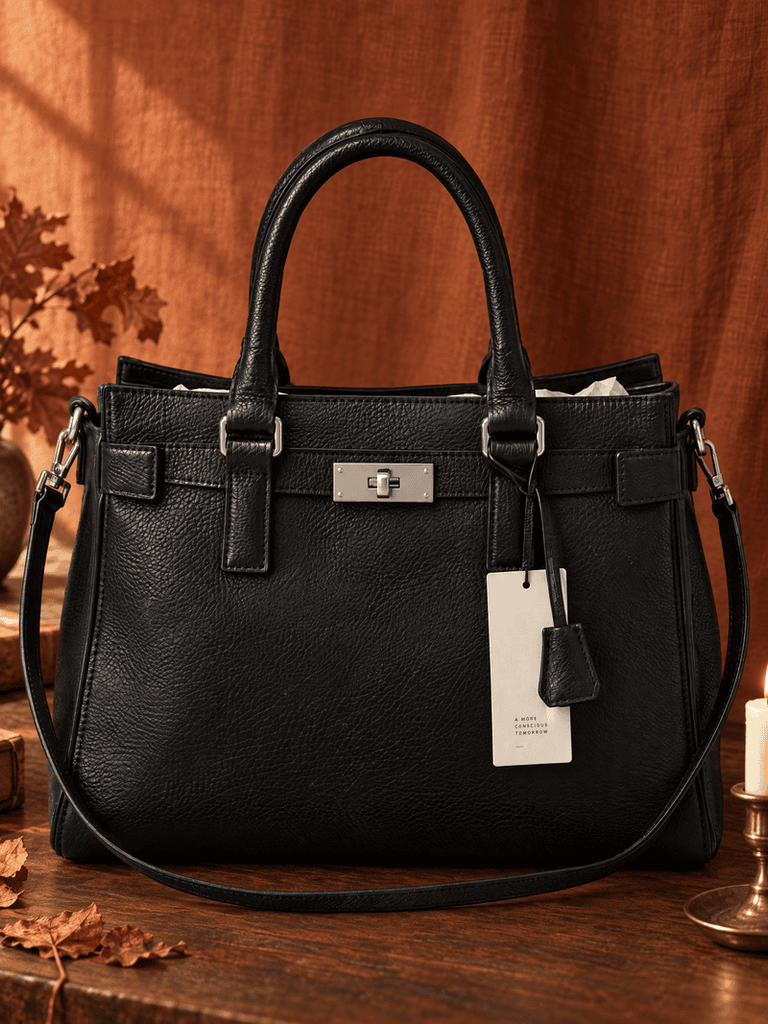
If the background is the only thing you want to change, like in prompt 11, the AI background changer is built for exactly that.
12. Restyle into a dark-romance mood (Photo A)
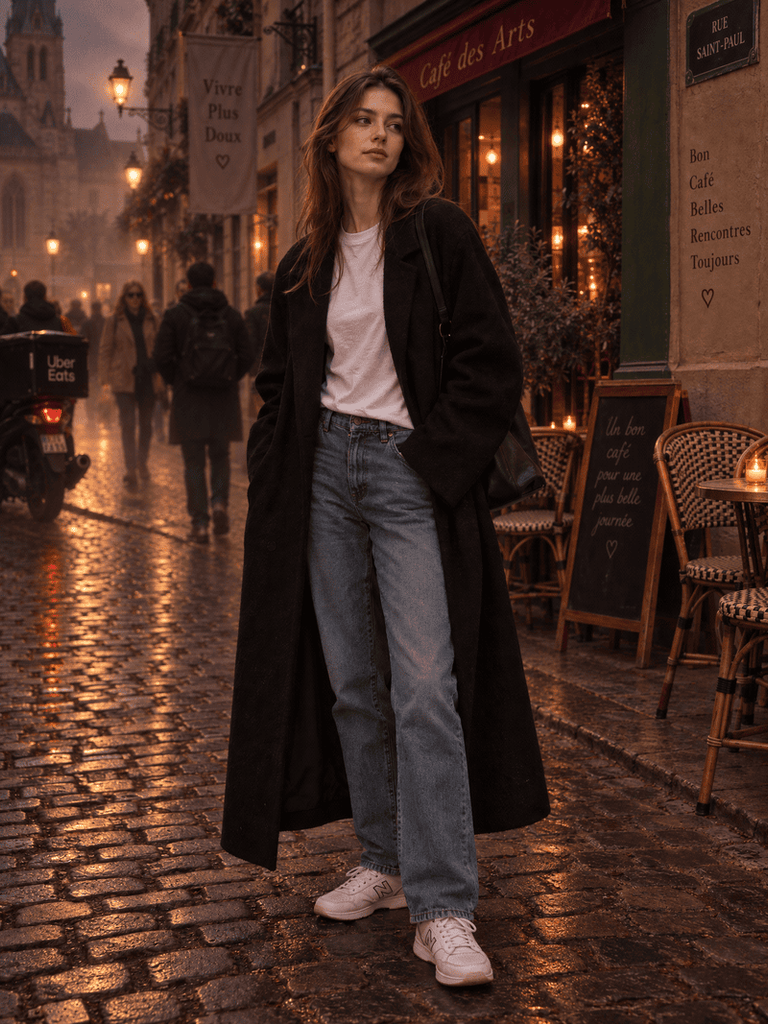
Restyle the photo into a dark romantic mood: deep burgundy and bottle-green tones, a soft candlelight glow on the skin, subtle film grain and a faint mist in the air. Keep the model’s face, outfit, pose and the composition unchanged, and do not add any new objects.
Locked: face, outfit, pose, composition
Tip: The final constraint (“do not add objects”) keeps mood prompts from filling the scene with candles and props.
Trend Swap Table: Make These Prompts Your Own
Every prompt above follows the same recipe, so you can swap in other elements. Here is a vocabulary table built from fall/winter 2026 trend reports. Replace the highlighted pieces in any prompt and keep the rest.
| Element | Trending options to swap in |
| Colors | chocolate brown, burgundy, plum purple, bottle green, ochre, scarlet, electric teal and turquoise |
| Prints & patterns | tartan, check and gingham, argyle, tapestry-style jacquard |
| Fabrics & textures | suede, shearling, faux fur, appliqué, beaded and fringed trims |
| Silhouettes | oversized shoulders, dropped waist, peplum, mini skirt with a high-low train |
| Footwear & legwear | over-the-knee boots, patterned or opaque tights |
| Bags & accessories | slouchy shapeless bags, fringe |
| Moods | dark romance, gothic glamour, sporty and athleisure |
Example swap: take Prompt 2 and replace “pleated tartan wool mini skirt in burgundy, forest green and navy” with “pleated gingham wool-blend mini skirt in plum and cream”. The Keep and Style parts stay the same.
Trends move fast. Treat this table as a seasonal starting point and refresh it each season.
Prompt Leveling: How One Edit Gets Better
The prompts above aren’t magic. They work because each one adds a layer of information. Here’s the same edit, turning a plain black coat into a chocolate-brown shearling coat, at four levels of detail.
| Level | Prompt | What usually happens |
| L1 | Make the coat brown. | The color can spill over the image, and skin or background may shift |
| L2 | Change only the coat to chocolate brown. Keep the face, hair and background the same. | The edit stays local, but the fabric looks flat and generic |
| L3 | Change only the coat to a chocolate-brown suede coat with a faux-shearling collar and cuffs, keeping the original length and fit. Keep face, hair, pose and background identical. | The garment becomes recognizable and the details survive |
| L4 | Change only the coat to a chocolate-brown suede coat with a faux-shearling collar and cuffs, a matte soft-nap finish and deep folds at the elbows, keeping the original length and fit. Match the existing soft overcast light. Do not change the face, pose, proportions or background. Do not add any new elements. | The most stable result, with fabric, light and extras controlled |
Each level adds one kind of information: scope (only the coat), detail (fabric, collar, finish), protection (what to keep) and constraints (light and no extras). When an edit goes wrong, ask which of those four is missing.
Fail Lab: Why Your Edits Go Wrong
Even good prompts fail sometimes. Here are the six most common symptoms, what usually causes them, and how to rewrite the prompt.
- The face changed. This usually happens when the prompt has no keep instruction, or leans on heavy style words. Add keep the face and hairstyle identical and cut back on the style words.
- The outfit lost its shape. The prompt changed the color or material but never locked the cut. Add keep the original cut, length and silhouette.
- The whole background was redrawn. The scope was too vague. Say exactly what to change and add leave the background untouched.
- The new item looks pasted on. The prompt didn’t ask for a lighting match. Add match the existing lighting and shadows.
- The edits conflict with each other. Too many changes were packed into one prompt. Split them into two or three sequential edits.
- The wrong image was edited. The roles of the two images weren’t clear. Label image 1 as the base and image 2 as the reference.
You’re Ready to Write Editing Prompts That Work
The best editing prompt does two jobs: it describes the change in detail, and it protects everything else. Use the four-part formula, pick the right type for your edit, borrow from the trend table, and when something goes wrong, check which layer of information is missing.
If you’ve rewritten a prompt several times and the result is still unstable, the problem is often the tool rather than the wording. A tool built for editing, such as Fashion Diffusion, keeps the face, outfit and background protected while it changes only what you ask for.
Bookmark this page, copy the prompts you need, and try them on your own photos in Fashion Diffusion. New accounts get free credits, so you can try it at no cost.
FAQ
An editing prompt is a written instruction that tells an AI image tool how to change an existing photo. It names what to change, what to keep, and the style the change should follow, so the rest of the image stays the same.
Describe the change in detail, then say what must stay the same, and add the lighting or style it should match. For example: “Change only the coat to chocolate-brown suede with a shearling collar. Keep face, pose and background identical. Match the existing light.”
Often yes, but results vary. Tools interpret instructions differently, so you may need to adjust wording or add stronger keep instructions when switching.
Name that part precisely, use “only,” and list what must remain untouched. Splitting complex changes into separate steps also helps.
Detailed enough to describe the result the way a stylist would: color, fabric, cut and one or two defining details. Short prompts leave the AI guessing, and guesses are where generic results come from.
Use one when accuracy matters: faces, garment fit, product shape or many images that need consistent results. Fashion Diffusion is built for these edits.


