

This guide covers how AI clothes editors work, how to pick the right input photo for clothing edits, and a step-by-step walkthrough using Fashion Diffusion — plus the most common reasons AI clothing edits look unrealistic and how to fix them.
Written by the Fashion Diffusion team. Fashion Diffusion is an AI fashion tool for clothing swaps, virtual try-on, and e-commerce photo production.
What Is an AI Clothes Editor
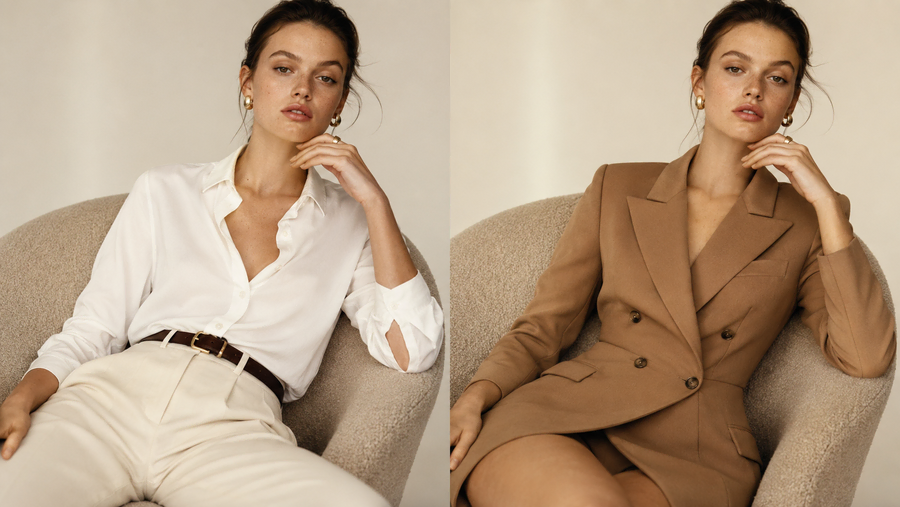
An AI clothes editor is a tool that replaces the clothing in a photo while leaving everything else — face, pose, skin tone, background, lighting — exactly as it was. You provide two inputs: a photo of a person and an image of the garment you want them to wear. The AI handles the rest, producing a result that looks like the person was photographed wearing that outfit. No studio. No model rescheduling. No Photoshop.
How Does an AI Clothes Editor Work
Stage 1: Segmentation
The process starts with segmentation: the AI identifies which pixels are clothing and which are skin, hair, and background. Whether you need to edit clothing in an AI workflow or swap a specific garment on a model photo, a clean segmentation mask is the foundation everything else depends on.
Stage 2: Inpainting
The AI then inpaints the clothing region with a new garment, conditioned on the surrounding image so the lighting, shadows, and body contour stay consistent. This is where quality lives or dies. If the segmentation mask is clean, the output looks natural. If the mask bleeds into hair, hands, or accessories, the output looks like a bad Photoshop job — regardless of which tool you use.
This means input quality controls output quality. More than the tool. More than the settings.
How to Pick the Right Input Photo for AI Clothing Edits
Before you upload anything, check your photo against this list. Getting this right eliminates most failure cases before they happen.
Pose
Front-facing or three-quarter angle works best. Crossed arms, turned backs, and extreme side profiles give the segmentation model less clothing surface to work with, so the result degrades fast.
Background
Plain or simple backgrounds. Busy backgrounds increase the chance the mask bleeds into areas it shouldn’t touch. If your best model photo has a complex background, use Fashion Diffusion’s background replacement tool to clean it up before running the clothes edit.
Lighting
Even, diffused light — studio, window, or overcast outdoor. Harsh directional shadows on the clothing area confuse the inpainting model when it tries to match the new garment’s shadow angles.
Clothing Visibility
The full garment should be visible from neckline to hem. Cropped photos that cut off the waist or lower half produce incomplete results.
Accessories
Heavy jewelry, scarves, or bags overlapping the clothing area are common failure points. Remove them from the photo or choose a photo where they don’t cross the clothing region.
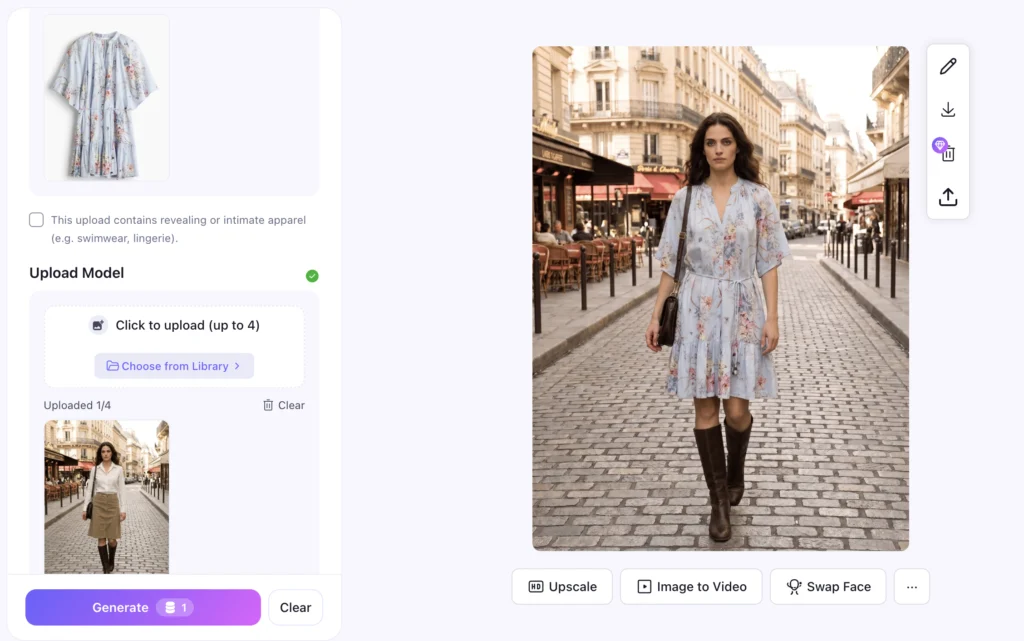
Step-by-Step: Edit Clothes in a Photo with Fashion Diffusion
- Go to Fashion Diffusion’s AI clothes editor and sign in to your free account.
- Upload your model photo — apply the input checklist above before uploading.
- Upload the garment image. Flat-lay photos and product images on white backgrounds give the most accurate results. On-model garment photos also work if the clothing area is clearly visible.
- Click Generate. Fashion Diffusion maps the garment onto the model while preserving pose, skin tone, and background.
- Download your result. If the output has edge artifacts around the neckline or sleeves, try a cleaner input photo rather than regenerating with the same images.
The full process takes under 30 seconds per image.
Based on our internal testing across thousands of generations, white-background flat-lay garment images combined with front-facing model photos produce the highest quality results — clean edges, accurate fabric texture, and no segmentation bleed in over 90% of cases. Complex backgrounds and crossed-arm poses are the two most common causes of failed outputs, accounting for the majority of regeneration requests from new users.
5 Reasons Your AI Clothes Editor Results Look Fake
Most failed outputs come down to the same handful of input mistakes — not the tool itself. Here’s what to look for and how to fix each one before you regenerate.
1. The Mask Bled into Hair or Hands
Fix: use a photo where the clothing boundary is clearly separated from hair and accessories. This issue is especially common with dark long hair against dark clothing — the segmentation model struggles to distinguish the two. Pull hair back, or choose a model photo where hair color contrasts clearly with the garment.
2. The Garment Photo Is Low Resolution
Fix: use the highest resolution product image available. The inpainting model samples texture detail from the garment image — a blurry source produces a blurry result.
3. The Lighting in the Model Photo and Garment Photo Conflict
Fix: match light direction roughly — both from the left, or both from the front. The AI corrects for some discrepancy, but extreme conflicts show up in the final shadow rendering.
4. The Pose Obscures Part of the Garment Area
Fix: choose a straighter, more frontal pose. The AI can’t inpaint what it can’t see.
5. You’re Using a General-Purpose Image Editor
General editors treat clothing edits as image generation prompts. Purpose-built tools like Fashion Diffusion are trained specifically on garment-to-model mapping, so fabric drape, body contour matching, and edge handling are significantly more accurate.
Try Fashion Diffusion’s clothes changer →
AI Clothes Editor vs Virtual Try-On — Which One Do You Need
Both tools change clothing in photos, but they solve different problems.
AI Clothes Editor
Works with an existing photo of a person and replaces what they’re wearing. You control the model — it’s your photo, your team’s model shot, or a customer’s selfie. Use this when you need to update a specific existing image or show a specific person in a different outfit.
Virtual Try-On
Virtual try-on places a garment on a model — AI-generated or uploaded — and is optimized for e-commerce product display, where consistency across hundreds of SKUs matters more than using a specific person’s photo. Use this when you need to generate product listing images at scale from a garment photo alone.
Start Getting Realistic AI Clothes Editor Results
The difference between a realistic AI clothing edit and a fake-looking one is almost always in the inputs — not the model, not the settings, not luck. Clean model photo, high-resolution garment image, matched lighting: get those three right and the output takes care of itself.
Fashion Diffusion is built specifically for garment-to-model mapping — not adapted from a general image editor. That means better edge handling, more accurate fabric rendering, and consistent results across large batches of product photos.
Try the AI clothes editor free →
Upload two images to Fashion Diffusion: a model photo and a garment image. The AI segments the clothing region, replaces it with the new garment, and renders the result with matching lighting and body contour. The full process takes under 30 seconds. For best results, use a front-facing model photo and a flat-lay or white-background garment image.
Photoshop requires manual masking and compositing — a skilled editor can spend 20–30 minutes on a single clean swap. An AI clothes editor automates the entire process, producing a comparable result in under a minute with no design skills required. For high-volume e-commerce workflows, the difference in production speed is significant.
Yes, and it’s one of the most common use cases. Upload one model photo and swap in multiple garments to generate a full product listing page without scheduling a photoshoot. Fashion Diffusion keeps the model’s pose, skin tone, and background consistent across every variation — making the output ready for Shopify, Amazon, and independent store listings.
Yes. Sign up for a free Fashion Diffusion account and you’ll get free credits to start editing clothes in photos right away. No credit card required for the free tier. Paid plans unlock higher resolution exports, batch processing, and watermark-free downloads for commercial use.


