

Your product photography is making or breaking sales before a customer reads a single word of your listing. Online shoppers can’t touch the fabric or try the garment on — your images carry the entire weight of communicating fit, quality, and style.
This guide covers exactly how to photograph clothing to sell online — from shoot setup and garment styling to platform-specific specs and where AI tools fit in.
How to Prepare Clothing for Photography: Before You Shoot
Poor preparation is the most common reason good product photos fail. No amount of great lighting fixes a wrinkled garment or a piece of lint caught on camera.
Steam or Iron Every Garment
Wrinkles read as cheap on camera — even small ones the human eye ignores in person become obvious in a product photo. Steam is generally preferred over ironing for knitwear and delicate fabrics.
Use a Lint Roller Immediately Before Shooting
Lint and dust show clearly against most fabrics, especially dark colors and structured materials.
Shape the Garment
Stuff tissue paper into shoulders and sleeves to maintain structure. Use straight pins on the back of a garment displayed on a mannequin to pull excess fabric and show a clean silhouette from the front. Clip excess fabric on hanger shots with binder clips behind — out of frame.
Keep Accessories and Styling Consistent
If you’re photographing complete looks, keep styling consistent across your catalog. The same belt, the same fold, the same collar position for every similar garment — small inconsistencies across a product range read as unprofessional.
Clothing Photography Lighting: Natural vs Artificial
Lighting determines more about your final image than any other factor. Get this right first; everything else follows.
Natural Light
Natural light works well for most sellers and costs nothing. The key is knowing how to use it.
- Position the garment next to a large window. North-facing windows give consistent, diffused light without direct sun. East-facing windows work well in the morning; west-facing in the afternoon.
- Avoid direct sunlight. Direct sun creates harsh shadows and blows out fabric detail. Diffuse it with a white sheet or sheer curtain stretched across the frame.
- Shoot within 2–3 hours of the window. Light changes throughout the day. Same window position, same time of day keeps your images consistent.
- Use a white foam board as a reflector. Place it on the opposite side from the window to bounce light back and fill shadows.
Artificial Light
When natural light is unavailable or inconsistent, a simple lighting setup gives you full control.
- A two-softbox setup is the industry standard. One softbox at 45 degrees, a second on the opposite side at half intensity. Even coverage without flat, directionless light.
- Ring lights are practical for small items and hanger shots, less effective for larger garments where the circular catch light becomes visible.
- Match your color temperature. Mixing daylight and artificial light creates color casts. Use one source consistently.
How to Photograph Clothing to Sell: Three Formats
There is no single correct format for clothing photography. The right choice depends on the garment type, the sales channel, and what question the image needs to answer for the buyer.
1. Flat Lay Clothing Photography
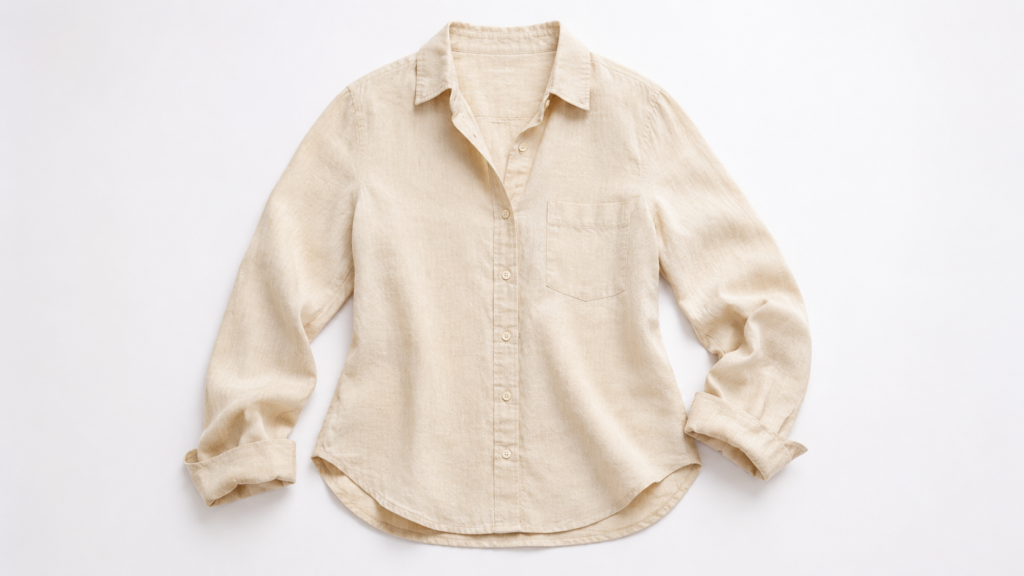
Flat lay presents the garment from directly above, laid on a flat surface. It works well for lightweight garments, folded basics, accessories, and social media content.
Setup: Clean background (white seamless paper, or a surface that complements the garment), camera or phone directly overhead, even lighting from both sides.
Styling tips:
- Steam the garment and let it settle before shooting — it needs to lie flat naturally
- Leave space around the garment; don’t fill the entire frame
- Arrange the garment with a slight natural curve in the body and a soft fold in the sleeves — this avoids the stiff, lifeless look of a garment that’s been forced flat
When it’s the right choice: Casual tops, folded knitwear, accessories, complete outfit layouts for social content, and any channel where a clean, top-down view communicates the product clearly.
The AI shortcut: If you have existing model or mannequin photos and need flat lay versions, Fashion Diffusion’s Flat Lay Generator converts them automatically — consistent background, reconstructed garment structure, no additional photography setup.
For a full breakdown of when to use flat lay vs ghost mannequin vs on-model shots, the angles table later in this guide covers all garment types
2. Hanger Shots
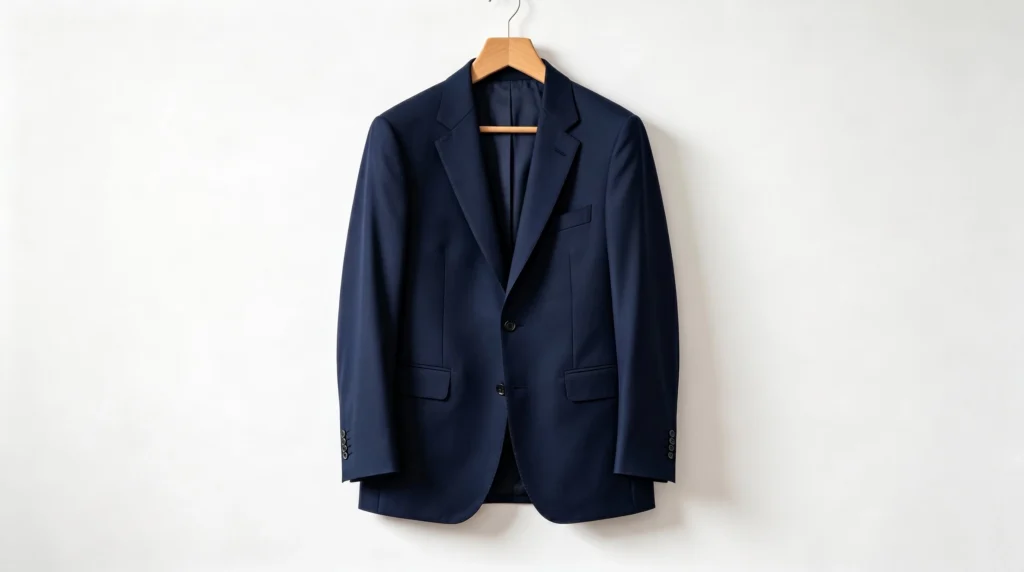
Hanger shots are efficient and work well for showing garment length and drape. A practical choice for high-volume catalog production.
Setup: Clean wall or seamless background, garment on a quality hanger (wooden or velvet — thin plastic hangers make garments look cheap), camera at the same height as the center of the garment.
Styling tips:
- Button the top button of shirts and jackets; tuck in any loose tags
- Steam the garment while it’s on the hanger so it hangs naturally
- The hanger choice matters more than sellers expect — a premium hanger signals a premium product
When it’s the right choice: High-volume catalog production, garments where length and drape are key selling points (dresses, blouses, coats).
3. On-Model Clothing Photography
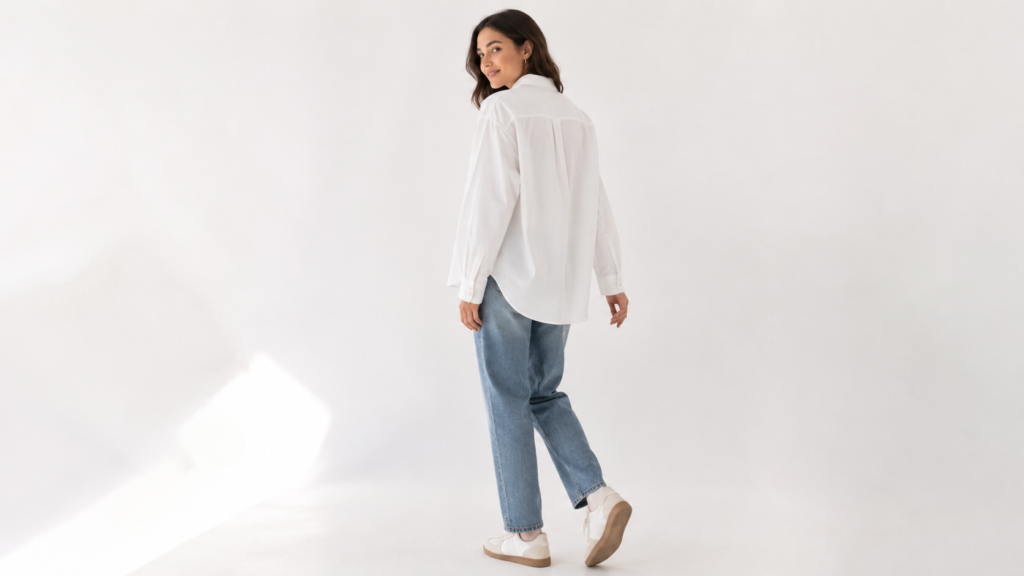
On-model photography communicates fit, movement, and scale better than any other format. Natural posing beats editorial for e-commerce — stiff poses can undermine trust when a shopper is trying to answer: how will this fit me?
With a live model:
- Shoot at eye level or slightly below — shooting down on a model makes garments look smaller
- Capture movement: a slight turn, a hand in a pocket, fabric in motion. Static poses lose the energy that makes people want to own the item
- Always shoot front, back, and at least one three-quarter view. Buyers who can’t see the back of a garment often skip it
With a mannequin:
- Use a matte white or gray mannequin — high-gloss finishes create distracting reflections
- Pin garments from the back to achieve a clean, fitted silhouette from the front
- Shoot the same angles as you would with a live model
Camera Settings and Equipment
You don’t need expensive equipment to photograph clothing well. A modern smartphone handles most product photography competently. What you need is control over a few key settings.
Smartphone Photography
- Disable auto-HDR — HDR processing often oversaturates fabric colors. Shoot in standard mode.
- Lock focus and exposure — Tap and hold on the garment in the viewfinder to lock both.
- Shoot in RAW if available — RAW gives more latitude for color and exposure correction in post.
- Use a tripod — A lightweight tripod with a phone mount costs under $30 and eliminates camera movement entirely.
DSLR and Mirrorless Settings
- ISO 100–200. Low ISO keeps images clean and free of digital noise.
- Aperture f/5.6–f/8 for flat lays. For mannequin and model shots, f/2.8–f/4 gives slight background separation.
- White Balance: manual. Set to match your light source. Auto white balance drifts between shots.
- Use a remote shutter or 2-second timer. Pressing the shutter physically moves the camera, causing blur at slower shutter speeds.
Which Angles to Photograph for Clothing Listings
Different garment types need different angles. The goal is to give buyers enough information to make a confident decision without returning the item.
| Garment Type | Essential Shots | Optional |
| Tops (t-shirt, blouse, shirt) | Front, back, three-quarter | Detail (collar, cuffs, hem), flat lay |
| Dresses | Front, back, side, three-quarter | Detail (neckline, back, print), on hanger |
| Outerwear | Front, back, three-quarter, open and closed | Interior lining detail, collar close-up |
| Trousers | Front, back, side, length shot | Pocket detail, waistband close-up |
| Knitwear | Front, back, fabric texture close-up | Draped on surface, flat lay |
| Accessories | Multiple angles, scale reference | Detail shots, styled with garment |
Flat detail shots matter more than sellers expect. Close-up images of fabric texture, buttons, stitching, or a unique back detail are frequently the deciding factor for buyers who are almost persuaded.
How to Extend One Clothing Photo into a Full Catalog with AI
Traditional photography produces a fixed set of images per garment. AI tools let you extend a single good photo into multiple formats and variations without additional shooting.
Generate Flat Lays from Model Photos
If you shoot on-model but also need clean flat lays for marketplace listings, Flat Lay Generator converts model-worn shots into flat lay format automatically. One shoot produces both formats.
Adapt One Image for Multiple Platforms
Each sales channel has different visual requirements. Change Background lets you produce white-background versions for Amazon, lifestyle versions for Instagram, and branded scene versions for your own site — all from the same source image.
Test Colorways Without Reshooting
When a garment comes in multiple colors, Recolor generates the same image in every colorway from one source photo — consistent model, consistent background, consistent presentation across the full color range.
Generate Video for TikTok and Reels
Static product photos don’t perform on TikTok. AI Fashion Video animates any product photo into a short video clip — fabric movement, camera pan, or model motion — ready to publish without separate filming.
Clothing Photography Specs by Platform: Amazon, Shopify, Etsy, TikTok
Photographing clothing well is step one. Getting those images to meet each platform’s requirements is step two.
Amazon
- Main image: White background (#FFFFFF), product fills 85% of frame, no props or text
- Minimum resolution: 1000px on the longest side (2000px+ recommended for zoom)
- Format: JPEG preferred
- Additional images: Can include lifestyle, flat lay, detail, and infographic images — white background not required
(Per Amazon’s official image requirements)
Shopify and Your Own Store
- Aspect ratio: Consistent across all products — square (1:1) is common, portrait (4:5) increasingly popular for mobile
- Resolution: 2048 × 2048px maximum; Shopify scales down automatically
- Consistency: Same background, same styling approach across your catalog
Etsy
- Main image: Can include lifestyle photography (not required to be white background)
- Minimum size: 2000px wide recommended
- Square crop: Etsy thumbnails appear square — compose your main image to work at square crop
TikTok and Instagram Reels
- Aspect ratio: 9:16 vertical
- Resolution: 1080 × 1920px
- Video length: 5–30 seconds for discovery content
- Hook: Product must be clearly visible within the first second
Editing Clothing Photos to Sell: What to Fix and What to Avoid
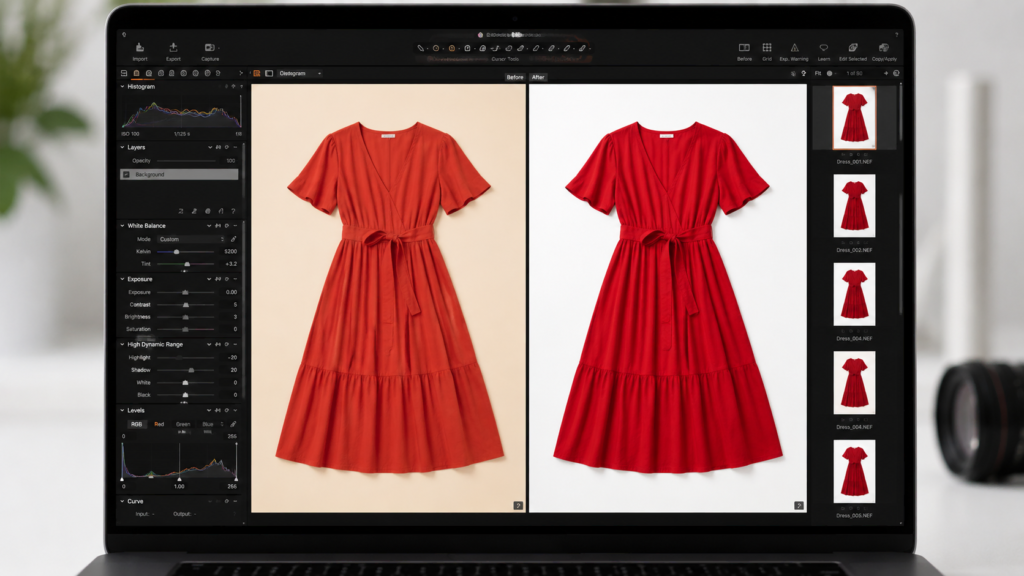
Editing makes a good photo better. Over-editing makes it look fake — and when buyers receive a product that doesn’t match the listing image, returns follow.
Color Correction
Your primary goal. Match the garment’s color to how it actually looks in person. Check against a physical sample under neutral light and adjust until they match.
Exposure and Contrast
Minor adjustments to recover detail in shadows or pull back highlights. Don’t push these settings hard — aggressive contrast looks artificial.
Background Cleanup
Remove lint, dust specks, or small floor marks. Most editing apps have a spot healing tool for this.
Crop and Straighten
Keep crops consistent across your catalog. If you’re shooting flat lays, use a grid in-camera to keep the garment straight — fixing a rotated flat lay in post degrades image quality.
What Not to Do
- Don’t smooth or blur fabric texture — buyers need to see what the material looks like
- Don’t use filters that shift overall color tone — they make color accuracy impossible
- Don’t resize to a low resolution to reduce file size — use proper compression tools instead (Squoosh, TinyJPEG, or Shopify’s built-in compression)
Image SEO for Clothing Listings: File Names, Alt Text, and Schema
Good product photography that isn’t SEO-optimized doesn’t get found. These steps take minutes and have a measurable effect on visibility.
File Naming
Name every image descriptively before uploading. IMG_8472.jpg tells search engines nothing. women-linen-blazer-beige-front.jpg tells them exactly what the image shows. This directly affects image search rankings and helps your product pages appear in visual search.
Alt Text
Write a short, descriptive alt text for every image. Be specific: “Front view of a beige linen women’s blazer on a white background” is more useful than “blazer.” Alt text is read by screen readers (accessibility) and indexed by search engines (discoverability).
File Size and Compression
Large image files slow page load times, which hurts both user experience and search rankings. Compress images to under 200KB where possible without visible quality loss. Tools like Squoosh (free, browser-based) handle this well.
Structured Data
For product pages, implement Product schema markup. This tells search engines the product name, price, availability, and image URL in a machine-readable format — increasing the chance of appearing in rich results and image carousels.
Photograph Clothing for Your Store with Fashion Diffusion
Fashion Diffusion’s AI tools work alongside your photography — converting existing product photos into flat lays, on-model shots, multiple colorways, and short-form video without additional shooting.
Try Fashion Diffusion AI free →
FAQs
Three options. Flat lay photography places garments on a surface and shoots from above — no model or mannequin needed. Hanger shots hang the garment against a clean background. Ghost mannequin photography shoots on a mannequin, then removes the mannequin in editing to create a 3D inhabited look. AI tools like Fashion Diffusion’s Virtual Try-On generate on-model images from a flat lay or product photo without booking a model.
White or light gray seamless paper is the standard for marketplace listings (required for Amazon’s main product image). For lifestyle content and your own store, any background that complements the garment works. Consistency matters more than the specific choice.
No. A modern smartphone handles most product photography well, especially in good natural light. The limiting factors are lighting, preparation, and consistency — not camera hardware.
At minimum: front, back, and one detail shot. For most garments, four to six images is the practical range — front, back, side or three-quarter, detail, and a flat lay or on-hanger alternate.
Amazon requires a minimum of 1000px on the longest side, with 2000px or larger recommended for zoom. The main image must have a pure white background (#FFFFFF) with the product filling 85% of the frame.


