

Changing clothes in a photo used to mean Photoshop layers, manual masking, and a lot of trial and error. Change clothes AI tools like Fashion Diffusion’s clothes swap tool have replaced that entire process with a single upload. You give the AI a photo and a garment, and it puts the two together — matching pose, lighting, and body shape automatically.
This guide walks through exactly how to change clothes in a photo with AI, step by step, including the photo habits that actually affect your results. Most failed outfit swaps don’t come from a weak AI model — they come from a weak input photo. Fix that, and quality jumps immediately.
What Is an AI Clothes Changer
An AI clothes changer is a tool that swaps the outfit in a photo without any manual editing. You upload a photo of a person and a photo of a garment, and the AI generates a new image of that same person wearing the new clothing — keeping the face, pose, and background intact.
This is different from filters or sticker-style overlays, which just paste a flat image on top of a photo. An AI clothes changer actually re-renders the garment to fit the body’s shape, angle, and lighting, which is what makes the result look like a real photo rather than an edited one.
How AI Changes Clothes in a Photo
Knowing the basic process explains most of the tips in this guide. It happens in three steps:
- Body and pose detection. The AI maps the person’s outline and posture, and separates the existing clothing from skin, hair, and background. A clear, front-facing photo makes this step far more accurate.
- Garment mapping. The new garment photo is re-rendered to follow the body’s contours and angle, with lighting recalculated to match the original photo.
- Selective blending. Only the clothing region is regenerated; the face, hands, and background stay untouched. This is why edge areas like collars and cuffs are where issues most often show up.
Who Uses AI Clothes Changers (and What For)
The same tool gets used for fairly different goals depending on who’s behind the upload.
A few common ones:
- Shopping decisions. Before buying an item online, upload a photo of yourself and the product image to see roughly how it would look, instead of relying only on a model photo with a different body type and skin tone.
- Content creation. Creators use an AI clothes changer to produce multiple outfit looks from a single photo session — useful for social posts, lookbooks, or testing which styles get better engagement before committing to a real shoot.
- E-commerce and catalog work. Online sellers and small fashion brands use it to show the same garment on different body types, or to generate fresh product visuals from existing inventory photos without booking a new model or studio session.
- Design and prototyping. Designers use a rough sketch or sample garment photo to visualize a concept — a fabric, a silhouette, a color combination — on a real body before committing to a sample or photoshoot.
- Wardrobe planning. Some people use it simply to decide what to wear from items they already own, by quickly previewing combinations on their own photo.
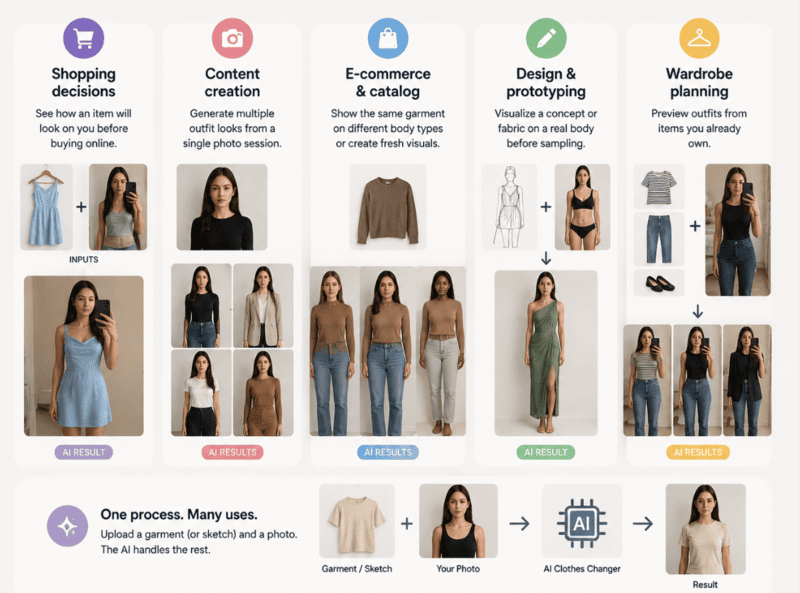
None of these require different tools or settings — the underlying process is the same. What changes is the garment photo you choose to upload for the task at hand.
What You Need to Change Clothes in a Photo with AI
Before opening any AI clothes changer online free tool, gather two things:
- A photo of the person (yourself, a model, or a customer photo) whose outfit you want to change;
- A photo of the new garment you want to put on them — a flat lay, a product photo, or a photo of someone else wearing it.
That’s it. No design software, no manual cutout work, no layering. The AI handles segmentation, fit, and lighting on its own.
Step 1: Pick a Photo That Works Well for AI Outfit Changes
This is the step most tutorials skip, and it’s the one that decides whether your result looks real or broken. The AI is only as good as what you feed it.
Best Photos for an AI Clothes Changer
- Front-facing, full body or half body. A straight-on pose gives the AI a clean view of the body outline. Full body is best for dresses, jumpsuits, and pants; half body is fine for tops, shirts, and jackets.
- Even, natural lighting. Daylight near a window or outdoor shade works better than harsh flash or backlighting, since the AI needs to read shadows correctly to make the new outfit sit naturally.
- Plain or simple background. A cluttered background doesn’t break the AI, but a clean one helps it separate the person from the scene faster and more accurately.
- Visible body outline. Arms slightly away from the torso, not crossed or hidden, so the AI can map where the garment edges should fall.

Photos to Avoid When Changing Clothes with AI
- Side profiles or extreme angles. The AI fits clothing based on what it can see — a side view gives it half the information it needs.
- Heavily filtered or edited photos. Beauty filters, warped proportions, or heavy color grading confuse the body-mapping step before clothing is even applied.
- Group photos. The AI needs to lock onto one person. Crop to a single subject first.
- Low resolution or blurry images. Compressed screenshots or zoomed-in crops lose the detail the AI needs for clean edges around hands, hair, and clothing lines.
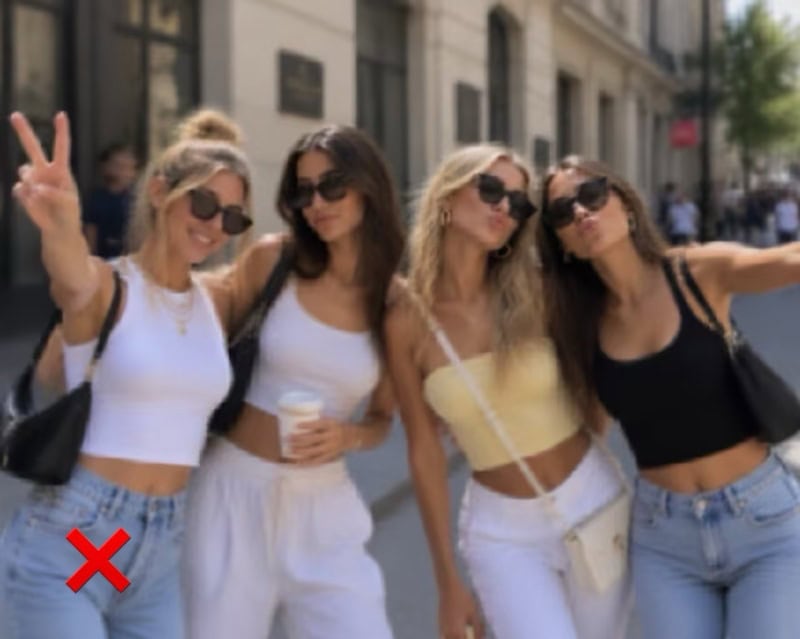
A quick rule of thumb: if you can clearly see the person’s outline and posture at a glance, the AI can too.
Step 2: Pick a Clean Garment Photo
The second input matters just as much as the first. Pick a garment image where:
- The clothing is fully visible and not blocked by bags, hands, or folded fabric;
- The image is reasonably sharp — a product photo or flat lay works better than a low-res screenshot;
- The garment isn’t extremely cropped (you want the AI to see the full neckline, hem, or sleeve length).
Product photos from any online store, your own camera roll, or a flat lay you shoot yourself all work. Solid colors and simple patterns convert most reliably; very busy prints or sequins can occasionally render with minor texture loss, which is worth knowing going in rather than discovering after several attempts.
Step 3: Generate the Outfit Change with Fashion Diffusion
Once you have a clear subject photo and a clean garment photo, the actual outfit swap takes under a minute:
Open Fashion Diffusion. Fashion Diffusion’s AI clothes changer tool runs directly in your browser — no install needed.
- Upload the subject photo — the person whose outfit you want to change.
- Upload the garment photo — the new clothing you want them wearing.
- Generate.
- Review and download. Results are ready in seconds in high resolution.
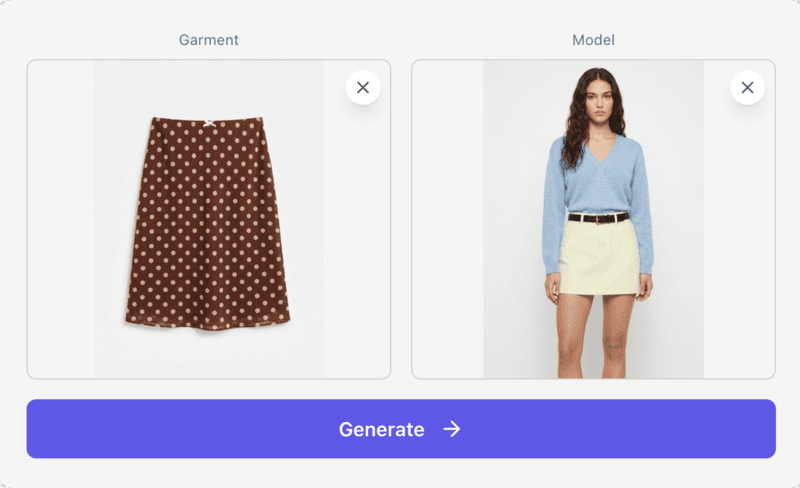
If the first result isn’t quite right, you don’t need to start over — just swap in a sharper version of either input photo and run it again. Small input changes usually fix most issues.
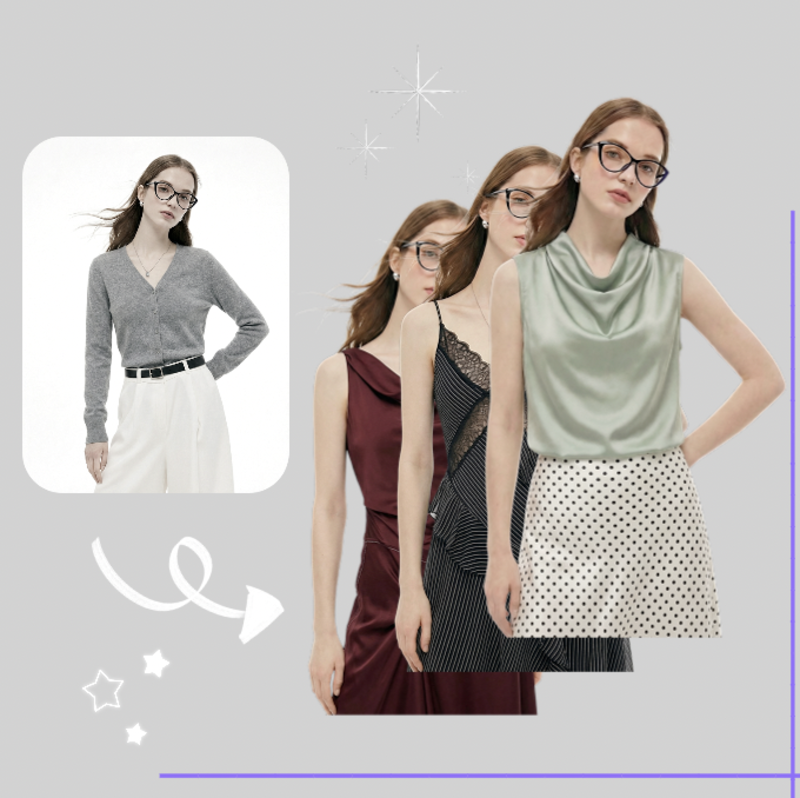
Step 4: Iterate Until the Result Looks Right
Even with two solid input photos, the first result isn’t always perfect — and that’s normal. Instead of treating one generation as final, treat it as a first pass:
- Generate once, then review closely. Zoom in on the edges — collar, sleeves, where hair meets the shoulder. These are the areas most likely to show small artifacts.
- Use AI Inpainting for targeted edits. If the outfit looks close but the style, fit, or a specific detail isn’t quite right, refine only the area you want to change with AI Inpainting tool instead of generating the entire image again. You can adjust garment shapes, replace details, or modify the clothing style while keeping the rest of the image consistent.
- Change one input at a time. If something looks off, swap only the subject photo or only the garment photo, not both. This makes it clear which input actually caused the issue.
- Keep your best result before trying again. Download each version you are happy with before regenerating, since a new attempt replaces the previous output.
- Run two or three variations for anything client-facing or commercial. For catalog images, social content, or anything going out publicly, generating a couple of versions and picking the cleanest one takes less time than troubleshooting a single imperfect result after the fact.
Why AI Clothes Changes Fail (and How to Fix Them)
Even with a good AI clothes changer, small issues can still appear if the input photos aren’t ideal. Most failed results come from a few common mistakes rather than the AI itself. The table below explains the most frequent problems, what usually causes them, and the easiest ways to fix them before generating again.
| Problem | Likely Causes | Fix |
| Outfit doesn’t match body shape | Side angle or unclear pose | Use a front-facing, full-body photo |
| Blurry or warped clothing edges | Low-resolution input | Upload a sharper, higher-res photo |
| Wrong garment proportions | Cropped or partially hidden garment photo | Use a full, unobstructed garment image |
| Unnatural lighting on new outfit | Lighting mismatch between the two photos | Match lighting conditions where possible |
| AI struggles with the pattern | Busy print, sequins, or lace | Try a simpler version first, then the detailed one |
Change Clothes in Your Photo with Fashion Diffusion
No design software, no studio, no waiting on edits — just two photos and a few seconds. The process is the same one covered in this guide: upload a clear, front-facing photo of the person, pair it with a clean garment image, and let the AI handle the rest.
Try our free AI clothes changer and see the outfit change generated instantly, in high resolution. Whether you are previewing an outfit before buying, building out product visuals for a store, or putting together content for a shoot, the same upload-and-generate process applies. New accounts start with free credits, so you can try it right now — no commitment, no learning curve, just a result in seconds.
FAQ
Upload a photo of the person and a photo of the garment you want them to wear into an AI clothes changer like Fashion Diffusion. The AI detects the existing outfit, analyzes pose and body shape, and generates a new image with the new clothing applied — typically in under a minute.
No. The tool is built to keep everything outside the clothing region untouched — face, pose, skin tone, and background stay exactly as they were in the original photo. Only the garment area is detected and replaced.
This almost always comes down to the input photos. Side-angle poses, blurry images, heavy filters, and cropped garment photos are the most common causes. Switching to a clear, front-facing photo with even lighting usually fixes it.
Yes. The same upload process works whether you are replacing an entire outfit or a single piece. Crop the garment photo to the specific item you want applied, and the AI will focus the swap on that part of the body rather than the full look.
No. AI clothes changers handle masking, fit, and lighting automatically. You only need to upload the two photos — no manual editing required.
Yes. Signing up for Fashion Diffusion gives you free credits to use on tools including the AI clothes changer, with high-resolution, realistic output. Once those credits run out, continued use requires a paid plan.


